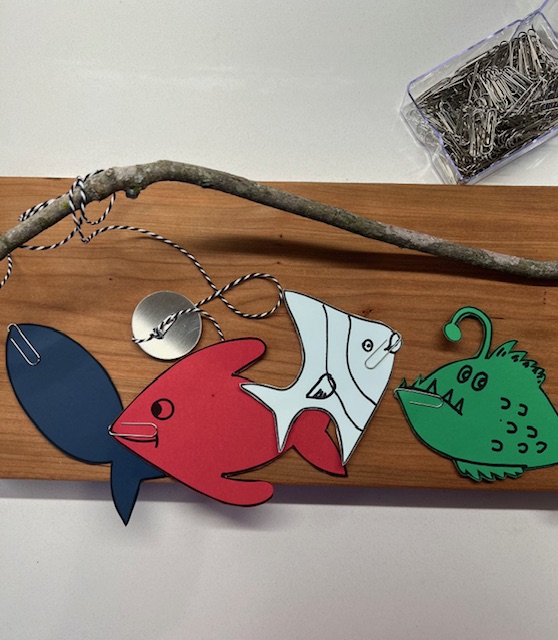
Let’s Go Fishing! A Visual Motor Game

This DIY visual motor fishing game is a fun and engaging activity for the whole family.   Work on visual motor, upper body strengthening, bilateral coordination, and various fine motor skills all while having fun.  In addition, this occupational therapy pretend play fishing tutorial includes 10 different ways to work on a variety of skills such as identifying colors and letters, and sight words as well as weight bearing exercises, and visual perceptual skills. 

Fishing Visual motor game

This content is not intended as a substitute for medical advice, diagnosis, or treatment.  Always seek the advice of your physician, therapist, or other medical professional regarding a medical condition or treatment.  This content is for informational purposes only.   See full disclosure here

All links in this post are non-affiliate links, and are provided for your convenience. 

Let’s Go Fishing: A Visual Motor Integration Activity

The Let’s Go Fishing visual motor game consists of a homemade fishing pole that has a magnet attached to the end of the fishing line (yarn).  Various-colored paper fish are cut out with paper clips attached.  The magnet is used to ‘catch’ the paper fish via the paper clip.

This is a fun game to do with friends and family all the while working on visual motor integration skills along with upper body and hand strength.  This is an engaging activity that can be used in a variety of ways. 

Listed below are 10 different ways to focus on various skills such as identifying colors and letters, counting, matching, pretend play, and weight bearing exercises.  During the set up phase, I’ve also described how to work additional visual motor integration skills as well as fine motor skills.  So make sure to check those out below. 

What Are The Fish Made Out Of?

I made the fish out of colorful cardstock.  However, the fish can also be made out of construction paper, and they can be laminated as well.  A paperclip is attached to the mouth area of the fish. 

Graded levels of cutting out fish, in order from easiest to more difficult starting with the navy blue basic oval fish.

Where To Find The Fish Printable?

I found these sweet, little FREE fish printables on the blog One Little Project….At A Time.  These fish printables are not only cute, but I thought they would be perfect for this project.  The variety of fish provide graded levels difficulty for scissoring.  Looking at the picture above, starting on the left with the navy blue fish, it will be easiest and less challenging to cut out for children learning to scissor.  Moving to the right, those fish will progressively get more challenging to cut. Print and cut out which fish is best for your learner. 

Furthermore, this printable also provides an opportunity to work on additional visual motor integration skills by copying the facial features and other markings onto the blank fish.  More on this in the next section. 


Ways To Encourage Fine Motor And Visual Motor Skills During Setup

Here are a few ideas on how to encourage additional fine motor and visual motor skills during set up:

  • Work on cutting along a line while scissoring.  For children who have difficulty opening the scissors, check out my tutorial for adaptive loop scissors.
  • Another great thing about these fish printables, is that one fish of every kind has facial features and other markings while the other fish are blank.  This is great as it creates an opportunity to work on visual motor integration skills, more specifically visual memory by copying the facial features and other markings on the fish. 
  •  Add an additional visual motor activity and grip strength activity while lacing.  After the fish have been cut out,  punch holes using a single hole puncher along the outside rim of the fish.  Using a long piece of yarn, tape one end to the back side of the fish, and begin lacing adding a sweet, decorative touch.  Optional, wrap one end of the yarn with tape to create a aglet, or try a dull ended darning needle.  
  • Work on picking up the paperclips one at a time using the pincer grasp (using the tips of the index and thumb to pick up small items).  Next, work on manipulating the paper clips to position over the fish’s mouth. 

What Skills Does The Let’s Go Fishing Visual Motor Game Work On?

The Let’s Go Fishing visual motor game is a great activity for building upper body strength, fine motor skills, bilateral coordination, and visual motor integration skills. It’s important to switch hands while fishing so that both hands work on upper body, bilateral coordination skills, and grip strength while fishing. This family fun activity incorporates the following skills:


  • Upper body and core strength
  • Grip strength 
  • Visual memory (a component of visual perception, the ability to recall what the eye has seen as in copying words from a board)
  • Bilateral coordination (the ability to use both sides of the body during a task) 
  • Visual perception and visual motor integration skills (visual perception is the ability to take in, interpret, and to make sense of visual information.  While visual motor integration skills is the ability to use the eyes (visual perception) and hands together in smooth and efficient ways (motor action). 
  • Manual dexterity (the ability to use the hands in a skillful and coordinated way to grasp and manipulate objects)
  • The pincer grasp (the ability to use the tips of the index finger and thumb to grasp small objects).

Other Skills To Work On While Playing The Let’s Go Fishing Visual Motor Game

visual motor fishing game
Work on identifying and matching uppercase with lower case letters. Practice writing letters after each fish is caught.
visual motor fishing game
Identify numbers by rolling a die/dice and catch that number of fish, and/or add and subtract the numbers on the fish caught. Work on writing numbers after each fish is caught.
visual motor fishing game
Practice catching and reading sight words, and/or call out a specific sight word to be caught. Work on handwriting skills while writing each sight word after it is caught.

#1: Colors

Work on identifying and catching specific fish based on the color.  
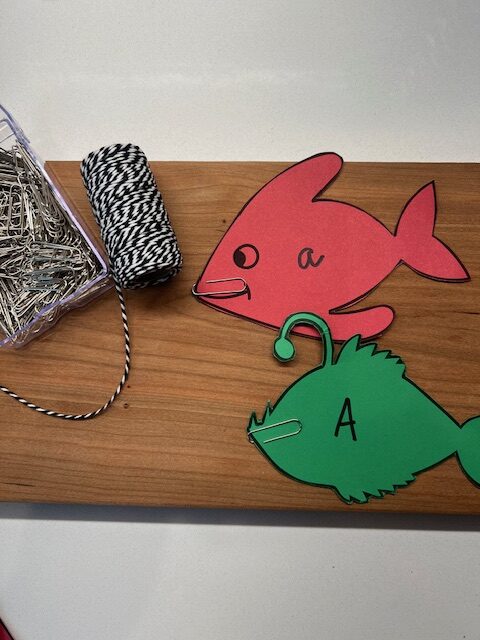
#2: Letters

Write various letters (capitals and/or lowercase based on your needs) on the fish.  Call out a letter while the fisherman ‘catches’ the correct letter fish.  Optionally, using paper and pencil or a small chalkboard such as a Learning Without Tears chalkboard, practice writing the letters of each ‘caught’ fish or vice versa.
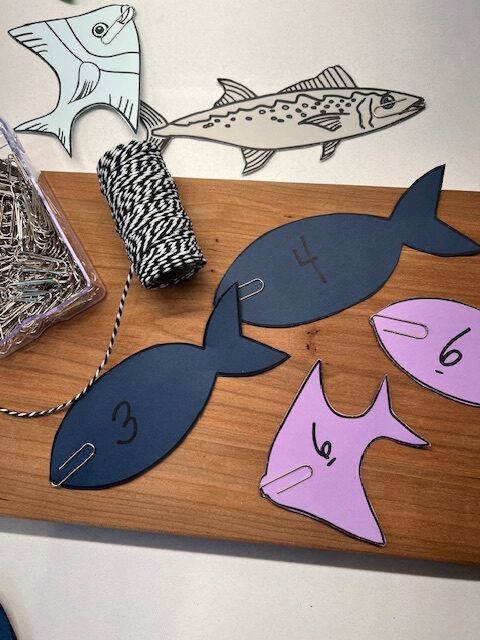
#3: Numbers

As above, write on the fish various numbers and work on identifying numbers while ‘catching’ the fish.  In addition, you can work on addition and even subtraction skills based on the numbers caught.  Roll one or two dice and catch that number of fish.  As mentioned above, using pencil and paper, or a small chalkboard such as Learning Without Tears chalkboard, practice writing the number caught. 


#4: Shapes

Draw a shape on each of the fish.  Either work on identifying the shape based on the shape called out, or work on matching shapes.  You can practice drawing shapes as well.  

#5: Matching Numbers and Letters

Work on matching numbers, shapes, and/or letters whether that’s matching uppercase to uppercase letters, or lower case to lowercase letters, or even matching uppercase to lowercase letters. Of course, you can also work on matching numbers, shapes, and even colors as well.
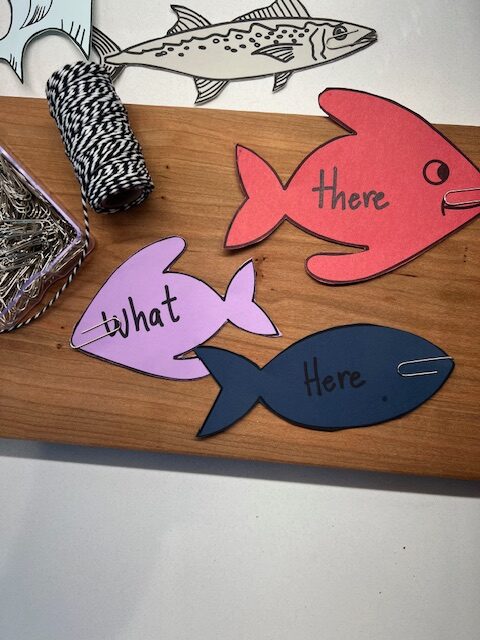
#6: Sight Words

Write sight words on the fish instead of letters and numbers to work on reading skills.  You can use this as a matching game as well. 

#7: Weight Bearing

Use this visual motor fishing game as a weight bearing activity while positioned in quadruped (on all fours, the crawling position), provide assistance as needed.  Scatter the fish further away.  The fishing line may need to be shortened by wrapping the string around the end of the fishing pole. Make sure to switch hands. Check out these upper body and core strength exercises. 

#8: Fishing On A Therapy Ball

Go fishing with a child positioned over a therapy ball in sitting or in prone position (belly down position)  with one hand on the ground to help keep the upper body upright.  Provide assistance as needed to ensure safety.  Scatter the fish further away to encourage full extension of the arm and back while in prone.  This is a great upper body and back strengthening exercise.  

#9: Pretend Play

Work on pretend play skills while going fishing.  Think camping, an outdoor adventure, a hiking trip, catching and cooking a family meal, etc.  

#10: Matching Memory Game

Label all the fish with either numbers, letters, shapes, or sight words, and flip over all the cards.  Now with at least two people, take turns flipping over two cards per turn to find a match.  If no match, flip the cards over again and it’s the next players turn.

How To Make The Let’s Go Fishing Visual Motor Game

visual motor fishing game
Print or draw fish. Then cut out.
visual motor fishing game
Copy and/or draw on any features on the fish.
Add paperclips to the mouth area. Attach your "fishing line" and tie on the magnetic hook. With needle nose pliers close the gap if needed.

Materials

  • Stick, trimmed or a dowel rod to use as a fishing pole
  • Yarn, thin twine, or other thin rope
  •  1 Magnetic hook (found at your local craft store) OR other magnet of choice
  • Needle nose pliers
  • Cardstock or construction paper, various colors
  • Marker(s)
  • Scissors
  • Printer or otherwise hand draw fish
  • Small paper clips

Instructions

  1. Draw or print and cut out fish using cardstock or construction paper.  The FREE fish printables I used are from One Little Project… At A Time.  Copy or get creative and make your own features on the fish such as gills, eyes, and fins. Optional, label fish as needed, as mentioned above, with numbers, letters, shapes or sight words.  
  2. Attach paper clips around the mouth of each fish. 
  3. Using a trimmed stick or dowel rod, attach a long piece of yarn to the end of the fishing pole and secure it with a knot. Base the length of your fishing line on the average height of the fishermen. My fishing line is approximately 28″ long.  
  4. Attach the magnetic hook, or magnet of choice, to the other end of the fishing line by tying a knot to secure.  If using a magnetic hook, use a needle nose pliers to close the hook end of the magnet (as seen above in picture) so that the yarn does not slip off easily while fishing.
  5. Done!  Make sure to switch hands while fishing so both sides of the body work on the same skills.  Have fun fishing!
visual motor fishing game

Sign Up For The DIY Newsletter and find me on Pinterest. 

Other Fine Motor and Visual Motor Projects You Might Be Interested In:

Fine Motor and Upper Body Resources:

Leave a Comment

Your email address will not be published. Required fields are marked *

Scroll to Top